Exporting ARKit face tracking results as an obj file
How to convert the ARFaceGeometry you get from ARFaceTrackingConfiguration into an MDLAsset and write it out in obj format with export(to:).
- Published
This article is also published elsewhere. https://iganin.hatenablog.com/entry/2021/12/18/214028
Originally written in Japanese. This is a translation of the same piece.
TL;DR
- Run
ARFaceTrackingConfigurationin anARSession - Convert the
ARFaceGeometryinto anMDLAsset - Use
MDLAsset’sexport(to:)method
About obj files
The obj format. The article below was a useful reference. Quoting from it, an obj file “can describe polygons made up of vertex coordinates, vertex normals and vertex texture coordinates. It can also describe only the vertex coordinates, or only coordinates and normals.”
The OBJ format - PukiWiki for PBCG Lab (Japanese)
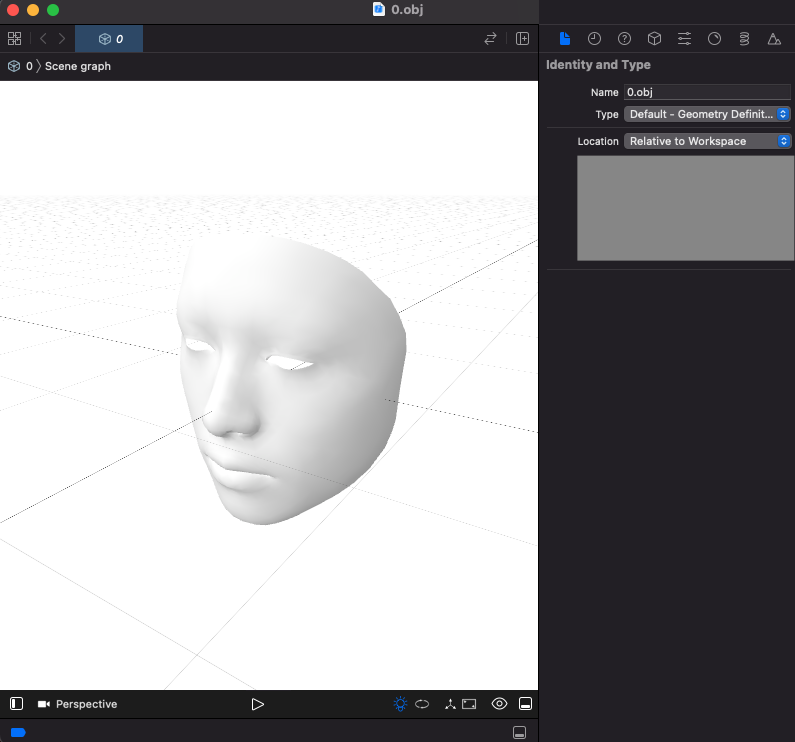
Viewing an obj file in Xcode looks like this. This one is data from ARKit face tracking of my own face, converted to an obj file. The goal of this article is to output ARKit’s detection results as an obj file like the one below.
ARKit face tracking configuration
A quick note on ARKit face tracking. You create an ARSession and specify
ARFaceTrackingConfiguration when you run it.
(Tracking and Visualizing Faces)
arSession.run(ARFaceTrackingConfiguration())
Using ARSCNView, you can get the face tracking information via the ARSCNViewDelegate method
renderer(_ renderer: SCNSceneRenderer, didUpdate node: SCNNode, for anchor: ARAnchor).
if let faceAnchor = anchor as? ARFaceAnchor {
  // do something with ARFaceAnchor
}
ARFaceAnchor gives you all sorts of information — eye positions, the direction the face is pointing, and
more (ARFaceAnchor) — but in this article we
use geometry: ARFaceGeometry.
ARFaceGeometry provides the vertices and texture coordinate system from approximating the shape of the
face as a triangle mesh.
(ARFaceGeometry)
With ARFaceGeometry you can display the shape of the face; the easy route is to draw it in an ARSCNView
using ARSCNFaceGeometry.
func renderer(_ renderer: SCNSceneRenderer, nodeFor anchor: ARAnchor) -> SCNNode? {
    guard let device = renderer.device else { return nil }
    let node = SCNNode(geometry: ARSCNFaceGeometry(device: device))
    return node
}
Below, we work out how to convert this data into an obj file.
Converting ARKit’s face geometry data into an obj file
To convert the face geometry into an obj file, we convert it into an MDLAsset.
(MDLAsset)
Reading the description of MDLAsset, the export(to:) method writes the contents of an MDLAsset out to
a file. (export(to:))
Here is how to convert the face geometry into an MDLAsset. The broad steps are:
- Create an
MDLMeshBufferDataAllocator - Create an
MDLSubmesh - Create an
MDLMesh - Create an
MDLAsset - Add the
MDLMeshto theMDLAsset - Export an obj file from the
MDLAsset
Creating an MDLMeshBufferDataAllocator
Initialising an MDLAsset is often done by specifying a URL and loading a resource, but here we use a
bufferAllocator.
(init(bufferAllocator:))
As the documentation says, this is the approach used to create an MDLAsset programmatically. Creating the
MDLMeshBufferAllocator looks like this:
let allocator = MDLMeshBufferDataAllocator()From here on, we use the allocator to turn the index, vertex and coordinate information into buffers.
Creating an MDLSubmesh
Next, create the MDLSubmesh. That needs an index buffer. For the face mesh here, ARFaceGeometry has
triangleIndices, so we use those. The initialisation looks like this:
let triangleIndicesBuffer = allocator.newBuffer(
    with: Data(bytes: triangleIndices, count: triangleIndices.count * MemoryLayout<Int16>.stride),
    type: .index
)

let subMesh = MDLSubmesh(
    indexBuffer: triangleIndicesBuffer,
    indexCount: triangleIndices.count,
    indexType: .uInt16,
    geometryType: .triangles,
    material: nil
)
Creating an MDLMesh
Now create the MDLMesh. The indices the mesh needs have already been created and handed to the submesh, so
here we pass the vertices and the coordinate for each vertex.
The verticesBuffer and coordinateBuffer look like this. Note the use of MemoryLayout.stride when
calculating the data size for creating the Data, so that each type’s memory size is accounted for.
Intuitively you might expect the coordinate to need two vectors, but once the normal is fixed the plane’s
coordinate system should be fixed as well, so it probably means the normal vector. (I have not read the
relevant documentation properly yet.) The vertex is a SIMD3, which I find very easy to follow.
let verticesBuffer = allocator.newBuffer(
    with: Data(bytes: vertices, count: vertices.count * MemoryLayout<SIMD3<Float>>.stride),
    type: .vertex
)

let coordinatesBuffer = allocator.newBuffer(
    with: Data(bytes: textureCoordinates, count: textureCoordinates.count * MemoryLayout<SIMD2<Float>>.stride),
    type: .vertex
)
Creating an MDLMesh requires a descriptor.
(init(vertexBuffers:vertexCount:descriptor:submeshes:))
The MDLVertexDescriptor is created like this. Since the data here is vertices and coordinates, those are
what get configured. For why this configuration is necessary, the Stack Overflow answer below goes into
detail. (Save ARFaceGeometry to OBJ file)
let vertexDescriptor = MDLVertexDescriptor()
vertexDescriptor.attributes[0] = MDLVertexAttribute(
    name: MDLVertexAttributePosition,
    format: .float3,
    offset: 0,
    bufferIndex: 0
)
vertexDescriptor.attributes[1] = MDLVertexAttribute(
    name: MDLVertexAttributeTextureCoordinate,
    format: .float2,
    offset: 0,
    bufferIndex: 1
)
vertexDescriptor.layouts[0] = MDLVertexBufferLayout(
    stride: MemoryLayout<SIMD3<Float>>.stride
)
vertexDescriptor.layouts[1] = MDLVertexBufferLayout(
    stride: MemoryLayout<SIMD2<Float>>.stride
)
Use that to create the MDLMesh.
let mdlMesh = MDLMesh(
    vertexBuffers: [verticesBuffer, textureCoordinatesBuffer],
    vertexCount: vertices.count,
    descriptor: vertexDescriptor(),
    submeshes: [subMesh]
)
mdlMesh.addNormals(withAttributeNamed: MDLVertexAttributeNormal, creaseThreshold: 0.5)
Calling MDLMesh’s addNormals
generates the actual data.
Creating the MDLAsset, adding the MDLMesh, and exporting the obj file
Create the MDLAsset and add the MDLMesh to it.
let asset = MDLAsset(bufferAllocator: allocator)
asset.add(mdlMesh)
Finally, export the MDLAsset. Note that the URL you pass must be a file URL, as stated in the MDLAsset
documentation.
let saveFile = FileManager.default.createDocFile(ext: "obj")
try asset.export(to: saveFile)